How to install Solar Panel Bird Mesh
Posted by Chris Voyce on
Many Australian homes and business owners have installed solar panels on their roofs in recent years to take advantage of government incentives in the form of subsidies and rebates. This has allowed many homeowners to utilise their roof as a power generating source in the form of solar energy.
However with any new development there comes unforeseen challenges. Solar panel installations on house roofs create ideal nesting locations for urban pest birds, especially pigeons. Solar panels offer shade and protection for the birds. Unfortunately this can result in costly damage to the solar panels and reduced efficiency. Pigeons can damage exposed wiring under solar panels, deposit droppings that eat into the surface of the panels as well as blocking sunlight that can reduce overall efficiency. In addition, leaves, twigs and other nesting materials can accumulate under solar panels reducing airflow which again reduces efficiency and can lead to damage from overheating.
WHAT'S THE SOLUTION?
Fortunately we have a solution - Solar Panel Bird Mesh Kits. These are DIY (Do it yourself) kits that can easily be installed by any home or business owner. The Solar Panel Bird Mesh Kits consist of a 30 metre roll of galvanised UV PVC coated mesh that attaches to the outer edge of the solar panels using specially designed fasteners. These fasteners clip onto the underside of the panel framework meaning there is no need for drilling into the panels as this may void your warranty.
Once the mesh has been installed to the entire perimeter of the solar panels, pigeons, rodents, leaves and other debris will be blocked from gathering underneath. Thus reducing ongoing cleaning and maintenance costs.
How to install Solar Panel Bird Mesh Kit
What you will need:
- Ladder
- Wire Cutters / Snips
- Pliers
- Work Gloves
- 30m Roll of Black UV PVC Coated Wire Mesh
- 100pk Solar Panel Mesh Fasteners
1. Fold end of solar panel mesh roll to 45 degrees

2. Fit fastener cap to end of fastener hook

3. Start at one corner of the solar panel array. Hold the wire mesh to the corner of the panel level with the top of the panel framework. Insert the fastener hook through the mesh with hook facing upwards and connect to the underside of the panel framework.
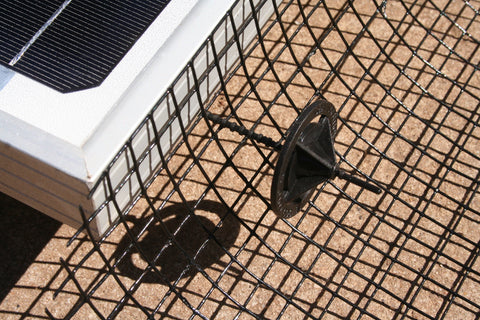
4. Hold the end of the fastener with one hand or pliers and slide the fastener cap until holding the mesh tight against the panel frame.

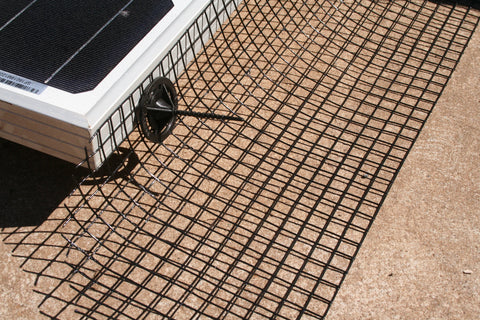
5. Tuck tail of hook into slot on fastener cap to finish. Repeat this process and work your way around the panel installing a fastener approximately every 30cm.

6. Fold the mesh corners over and under each other to finish the corners


For inside corners it is suggested that the mesh be cut to halfway up from the bottom to allow the mesh to be folded to shape.
For rails and switch gear you will need to cut windows or flaps to so that you can mold the mesh around.
Remember to take all proper precautions when working at heights such as the use of safety gear i.e a harness. If you don't have the proper safety gear or the access is difficult we recommend using the services of a professional installer.